Guide to wire art: различия между версиями
Pilman (обсуждение | вклад) (Полный перевод страницы, замена плашки) Метка: отменено |
Fareder (обсуждение | вклад) м (Откат правок Pilman (обсуждение) к последней версии CABLE) Метка: откат |
||
| Строка 1: | Строка 1: | ||
{{Needs | {{Needs translate}}June 2019 [[Guide_to_construction#How_Do_I_Wire.3F|wiring]] with [[Engineering_items#Cable_Coil|cable coils]] [[File:CableCoils.png]] was simplified and can no longer be done. Instead the "wire art" functionality was moved to an item called "Pipe Cleaner". Most of the images on this guide come from before that change, but wiring pipe cleaners should work the same as described. | ||
= | =Wire Art= | ||
[[File:Wiring.gif]] | [[File:Wiring.gif]] | ||
Pipe cleaners are directionally dependent on where you set them down, and will apply adjacently to each "tile" you are standing by. | |||
Pipe cleaners will always face inwards to you, sort of like above. You can wire pipe cleaners both under and on top of floor tiles. | |||
[[File:Wire laying1.PNG| | [[File:Wire laying1.PNG|u see her lik dis]] | ||
This image was made by standing in the center tile with pipe cleaners in hand and clicking on all 8 surrounding tiles. | |||
In situations where you can't wire pipe cleaners like this you have an alternative way. Just stand on a tile, face the direction you want it to go (ctrl+arrow key) and click the tile you're standing on. | |||
[[File:Wire laying2.PNG| | [[File:Wire laying2.PNG|is so easy]] | ||
This image was made by standing on the tile, pressing ctrl + left arrow key and then clicking the tile. The pipe cleaner was in my active hand. | |||
If you ever make a mistake with a pipe cleaner, use the wirecutters to trim them! | |||
== | == Knot Wiring == | ||
Let's say you have a situation that you need to fix: | |||
[[File:Wiring situation.png| | [[File:Wiring situation.png|oh shit man how]] | ||
The easiest method of wiring is knot-wiring. Also known as unsmooth or non-smooth wiring. | |||
Fixing this is simple: | |||
[[File:wire_1_1.PNG| | [[File:wire_1_1.PNG|yes]] → [[File:wire_1_2.PNG|yes yes]] → [[File:wire_1_3.PNG|wow]] Done. | ||
You just position yourself properly and click the tile to wire the pipe cleaner. Make sure you click on the plating (floor) and not the already laid pipe cleaners. This is because: | |||
[[File:wire_2_1.PNG| | [[File:wire_2_1.PNG|yes]] + [[File:wire_2_2.PNG|wait waht]] = [[File:wire_2_3.PNG|o god wow]] | ||
This might look about the same as in the previous image, however it's not. In the previous image your ending result had three pieces of pipe cleaner, one going from the east to the center, one going from the north to the center and one going from the west to the center. In this situation you have two pieces of pipe cleaner. One going east to west and one going north to center. The two pipe cleaners don't meet in the center, because the horizontal pipe cleaner is going east-west without it having a point (or knot) in the center. | |||
== | == Smooth Wiring == | ||
Just click on pipe cleaners that are "knotted" at on one end (you just need to click on the pipe cleaner, not the little knotted dot). | |||
To fix this situation with smooth wiring you'll have to follow the steps: | |||
[[File:Wire_1_1.PNG| | [[File:Wire_1_1.PNG|ok simple]] → [[File:Wire_3_2.PNG|so precision]] → [[File:Wire_3_3.PNG|such smooth]] → [[File:Wire_3_4.PNG|wow]] Done. | ||
In this method you first lay one cable to go from one of the directions to the center (image 1). You then position yourself in another direction and click on the already laid pipe cleaner piece (and not the floor!). This will make the already placed piece and the new piece combine into one smooth piece of wiring (image 2). You then place another piece to go from the last remaining direction to the center (image 3) and click it from the last direction to make a 2nd smooth piece of wiring (image 4). | |||
This method often uses up more pipe cleaner than dot-wiring, but it's prettier. | |||
More examples of wiring connections you can make: | |||
{| | {| | ||
| Строка 61: | Строка 60: | ||
| [[File:Connected.png|Connected wires]] | | [[File:Connected.png|Connected wires]] | ||
| | | | ||
| [[File:Not_connected.png| | | [[File:Not_connected.png|Not connected wires]] [[File:Not_connected_2.PNG|No ends are matching, given only one cable is a node here]] | ||
|- | |- | ||
|} | |} | ||
== | ==Wire Art Example== | ||
Hone your wiring skills and you might be able to make something like this one day.<br> | |||
[[File:naltronix_lotus_wire_art_2017.png]] | [[File:naltronix_lotus_wire_art_2017.png]] | ||
Текущая версия от 21:27, 2 августа 2023
| Моя твоя не понимать!
Эта страница была украдена с TG и за ее перевод и актуализацию еще никто не взялся. |
June 2019 wiring with cable coils ![]() was simplified and can no longer be done. Instead the "wire art" functionality was moved to an item called "Pipe Cleaner". Most of the images on this guide come from before that change, but wiring pipe cleaners should work the same as described.
was simplified and can no longer be done. Instead the "wire art" functionality was moved to an item called "Pipe Cleaner". Most of the images on this guide come from before that change, but wiring pipe cleaners should work the same as described.
Wire Art
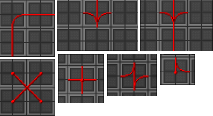
Pipe cleaners are directionally dependent on where you set them down, and will apply adjacently to each "tile" you are standing by. Pipe cleaners will always face inwards to you, sort of like above. You can wire pipe cleaners both under and on top of floor tiles.
This image was made by standing in the center tile with pipe cleaners in hand and clicking on all 8 surrounding tiles.
In situations where you can't wire pipe cleaners like this you have an alternative way. Just stand on a tile, face the direction you want it to go (ctrl+arrow key) and click the tile you're standing on.
This image was made by standing on the tile, pressing ctrl + left arrow key and then clicking the tile. The pipe cleaner was in my active hand.
If you ever make a mistake with a pipe cleaner, use the wirecutters to trim them!
Knot Wiring
Let's say you have a situation that you need to fix:
The easiest method of wiring is knot-wiring. Also known as unsmooth or non-smooth wiring.
Fixing this is simple:
You just position yourself properly and click the tile to wire the pipe cleaner. Make sure you click on the plating (floor) and not the already laid pipe cleaners. This is because:
This might look about the same as in the previous image, however it's not. In the previous image your ending result had three pieces of pipe cleaner, one going from the east to the center, one going from the north to the center and one going from the west to the center. In this situation you have two pieces of pipe cleaner. One going east to west and one going north to center. The two pipe cleaners don't meet in the center, because the horizontal pipe cleaner is going east-west without it having a point (or knot) in the center.
Smooth Wiring
Just click on pipe cleaners that are "knotted" at on one end (you just need to click on the pipe cleaner, not the little knotted dot).
To fix this situation with smooth wiring you'll have to follow the steps:
In this method you first lay one cable to go from one of the directions to the center (image 1). You then position yourself in another direction and click on the already laid pipe cleaner piece (and not the floor!). This will make the already placed piece and the new piece combine into one smooth piece of wiring (image 2). You then place another piece to go from the last remaining direction to the center (image 3) and click it from the last direction to make a 2nd smooth piece of wiring (image 4).
This method often uses up more pipe cleaner than dot-wiring, but it's prettier.
More examples of wiring connections you can make:

|

|
Wire Art Example
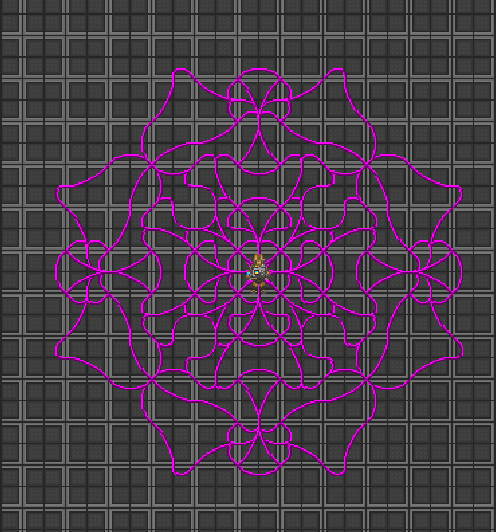
Hone your wiring skills and you might be able to make something like this one day.


